MobileNet SSD Object Detection using OpenCV 3.4.1 DNN module
MobileNet SSD object detection using OpenCV 3.4.1 DNN module
This post demonstrates how to use the OpenCV 3.4.1 deep learning module with the MobileNet-SSD network for object discovery.
As part of Opencv 3.4. + The deep neural network (DNN) module was officially included. The DNN module allows loading pre-trained models of most popular deep learning frameworks, including Tensorflow, Caffe, Darknet, Torch. Besides MobileNet-SDD, other architectures are compatible with OpenCV 3.4.1:
GoogleLeNet YOLO SqueezeNet R-CNN faster ResNet This API is compatible with C ++ and Python. : -) Descripton code
In this section, we will create the Python script for object detection and explain, how to load our deep neural network with OpenCV 3.4? How to pass the image to the neural network? and How to make a prediction with MobileNet or dnn module in OpenCV ?.
We use a pre-trained MobileNet taken from https://github.com/chuanqi305/MobileNet-SSD/ that was trained on the Caffe-SSD framework. This model can detect 2 classes.
Load and predict with the deep neural network module
First, create a new Python file mobilenet_ssd_python.py we put the following code, here we import the libraries:
Copy to Clipboard Syntax Highlighter 1 #Import the neccesary libraries 2 import numpy as np 3 import argparse 4 import cv2 5 6 #Next, add the parser command lines: 7 8 # construct the argument parse 9 parser = argparse.ArgumentParser( 10 description='Script to run MobileNet-SSD object detection network ') 11 parser.add_argument("--video", help="path to video file. If empty, camera's stream will be used") 12 parser.add_argument("--prototxt", default="MobileNetSSD_deploy.prototxt", 13 help='Path to text network file: ' 14 'MobileNetSSD_deploy.prototxt for Caffe model or ' 15 ) 16 parser.add_argument("--weights", default="MobileNetSSD_deploy.caffemodel", 17 help='Path to weights: ' 18 'MobileNetSSD_deploy.caffemodel for Caffe model or ' 19 ) 20 parser.add_argument("--thr", default=0.2, type=float, help="confidence threshold to filter out weak detections") 21 args = parser.parse_args() 22
The previous line sets the following arguments:
Video: video path file. Prototxt: network file is .prototxt Weights: the network weights file is .caffemodel Thr: confidence threshold.
Next, we define the labels for the classes on our MobileNet-SSD network.
Copy to Clipboard Syntax Highlighter 1 #Labels of network. 2 classNames = { 0: 'background', 3 1: 'aeroplane', 2: 'bicycle', 3: 'bird', 4: 'boat', 4 5: 'bottle', 6: 'bus', 7: 'car', 8: 'cat', 9: 'chair', 5 10: 'cow', 11: 'diningtable', 12: 'dog', 13: 'horse', 6 14: 'motorbike', 15: 'person', 16: 'pottedplant', 7 17: 'sheep', 18: 'sofa', 19: 'train', 20: 'tvmonitor' }
Next, open the video file or capture device depending what we choose, also load the model Caffe model.
Copy to Clipboard Syntax Highlighter 1 # Next, open the video file or capture device depending what we choose, also load the model Caffe model. 2 # Open video file or capture device. 3 if args.video: 4 cap = cv2.VideoCapture(args.video) 5 else: 6 cap = cv2.VideoCapture(0) 7 8 #Load the Caffe model 9 net = cv2.dnn.readNetFromCaffe(args.prototxt, args.weights)
On line 36, you pass the prototxt and weights arguments to the function, then we correctly load the network.
We then read the video frame by frame and pass it on the frame to the web for detections. With the DNN module it is easy to use our deep learning network in OpenCV and make predictions.
Copy to Clipboard Syntax Highlighter 1 while True: 2 # Capture frame-by-frame 3 ret, frame = cap.read() 4 frame_resized = cv2.resize(frame,(300,300)) # resize frame for prediction
On line 40-41, read the video frame and resize to 300× 300 because it is the image input size defined for the MobileNet-SSD model.
Copy to Clipboard Syntax Highlighter 1 # MobileNet requires fixed dimensions for input image(s) 2 # so we have to ensure that it is resized to 300x300 pixels. 3 # set a scale factor to image because network the objects has differents size. 4 # We perform a mean subtraction (127.5, 127.5, 127.5) to normalize the input; 5 # after executing this command our "blob" now has the shape: 6 # (1, 3, 300, 300) 7 blob = cv2.dnn.blobFromImage(frame_resized, 0.007843, (300, 300), (127.5, 127.5, 127.5), False) 8 #Set to network the input blob 9 net.setInput(blob) 10 #Prediction of network 11 detections = net.forward()
After the previous lines, we get the network prediction, just doing it in three basic steps:
Upload an image Preprocess the image Set the image as the network input and get the prediction result.
The use of the DNN module is essentially the same for the other networks and architectures, so we can replicate this for our own trained models.
Visualize Object Detection and Prediction Confidence
In conclusion, after the above steps, new questions arise, How to get the location of the object with MobileNet? How to know the predicted object class? How to get confidence in the prediction? Go!
We must read the detection matrix to get the prediction data from the neural network, the following code does this:
Copy to Clipboard Syntax Highlighter 1 #Size of frame resize (300x300) 2 cols = frame_resized.shape[1] 3 rows = frame_resized.shape[0] 4 5 #For get the class and location of object detected, 6 # There is a fix index for class, location and confidence 7 # value in @detections array . 8 for i in range(detections.shape[2]): 9 confidence = detections[0, 0, i, 2] #Confidence of prediction 10 if confidence > args.thr: # Filter prediction 11 class_id = int(detections[0, 0, i, 1]) # Class label 12 13 # Object location 14 xLeftBottom = int(detections[0, 0, i, 3] * cols) 15 yLeftBottom = int(detections[0, 0, i, 4] * rows) 16 xRightTop = int(detections[0, 0, i, 5] * cols) 17 yRightTop = int(detections[0, 0, i, 6] * rows)
We make a loop (line 62) to read the values. Then on line 63 we get the confidence of the prediction and the next line filter with threshold value. On line 65, get the label. On lines 68 through 71, get the corners of the object.
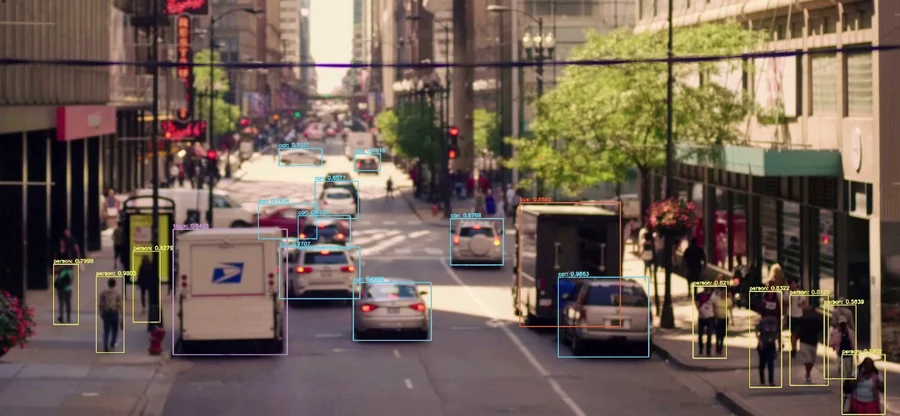
With all the information about the predicted object, the last step is to display the results. The following code drawing object detected and shows its label and trust in the frame.
Copy to Clipboard Syntax Highlighter 1 # Factor for scale to original size of frame 2 heightFactor = frame.shape[0]/300.0 3 widthFactor = frame.shape[1]/300.0 4 # Scale object detection to frame 5 xLeftBottom = int(widthFactor * xLeftBottom) 6 yLeftBottom = int(heightFactor * yLeftBottom) 7 xRightTop = int(widthFactor * xRightTop) 8 yRightTop = int(heightFactor * yRightTop) 9 # Draw location of object 10 cv2.rectangle(frame, (xLeftBottom, yLeftBottom), (xRightTop, yRightTop), 11 (0, 255, 0)) 12 13 # Draw label and confidence of prediction in frame resized 14 if class_id in classNames: 15 label = classNames[class_id] + ": " + str(confidence) 16 labelSize, baseLine = cv2.getTextSize(label, cv2.FONT_HERSHEY_SIMPLEX, 0.5, 1) 17 18 yLeftBottom = max(yLeftBottom, labelSize[1]) 19 cv2.rectangle(frame, (xLeftBottom, yLeftBottom - labelSize[1]), 20 (xLeftBottom + labelSize[0], yLeftBottom + baseLine), 21 (255, 255, 255), cv2.FILLED) 22 cv2.putText(frame, label, (xLeftBottom, yLeftBottom), 23 cv2.FONT_HERSHEY_SIMPLEX, 0.5, (0, 0, 0)) 24 25 print label #print class and confidence 26 27 cv2.namedWindow("frame", cv2.WINDOW_NORMAL) 28 cv2.imshow("frame", frame) 29 if cv2.waitKey(1) >= 0: # Break with ESC 30 break
Last lines, display the normal frame image and resize to screen.
Downloads
MobileNet-trained code and model can be downloaded from:
https://github.com/djmv/MobilNet_SSD_opencv